Friday, December 5, 2014

Quality Assurance


Project Manager
Wiwid Widyanto         1204001
Anggota
Dyah Ayu K.                  1206140
Eggy Febriansyah         1206181
Gita Marshelina           1200291
Nur Fuad Muhammad  1201742


TUGAS QUALITY ASSURANCE

Deskripsi SQA
2.1 Peran dan Tanggung Jawab SQA
Grafik berikut mendefinisikan peran dan tanggung jawab anggota tim proyek dan fungsi mereka SQA di
project checkpoints (stage exits).

Catatan:
Karena fluktuasi staf, jika orang tertentu tidak dapat memenuhi / tanggung jawabnya, maka akan menjadi tanggung jawab manajer mengawasi daerah itu untuk memastikan penggantinya, dengan keterampilan dan pengalaman yang sesuai, tepat waktu.


2.2 Keterampilan yang dibutuhkan
Para Quality Assurance konsultan harus mampu meninjau iterasi dari Rencana Proyek dan produk kerja siklus hidup untuk menentukan kepatuhan terhadap DOE dan standar industri, sebagaimana telah diubah dan didokumentasikan dalam Rencana Proyek, dan memberikan bantuan ahli praktek manajemen proyek dan hal-hal yang berhubungan dengan proses pengembangan perangkat lunak .

Posisi ini akan bekerja secara independen dari tim pengembangan untuk memastikan audit tujuan dari produk kerja karena mereka sedang dikembangkan dan ulasan objektif proses manajemen proyek dan
project checkpoints (stage exits).


Referensi:
SJ-RT
Smith Jones Rapid Transit
Software Quality Assurance Plan
February 1997
http://energy.gov/sites/prod/files/cioprod/documents/qa_plan1.pdf
 

Tuesday, November 11, 2014

Manajemen Proses Linux dan Linux Shell

$ps
Untuk melihat kondisi proses yang ada.
PID (Nomor Identitas Proses), TTY (Nama Terminal), STAT(Berisi Sleeping untuk S, dan Running untuk R), COMMAND merupakan instruksi yang digunakan.


$ps u
$ps -u <user>

$ps -a


$ps -au


$ps -aux

Melihat proses yang sedang berjalan
$top

Menampilkan hubungan proses parent dan child
$ps -eH

Menampilkan hubungan proses parent dan child serta letak prosesnya
$ps -eF

Menampilkan semua proses pada sistem dalam bentuk hirarki parent/child
$pstree


Menghentikan suatu prosses
$kill %<nomor job>
contoh: kill %1

$kill <PID>
contoh: kill 1908

$pkill <nama proses>
contoh: pkill firefox

$pkillall <nama proses>
contoh: pkillall firefox

Mengubah Prioritas Suatu Proses
$renice <prioritas> <PID>

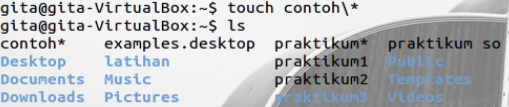
Escape character. Jika anda menginginkan untuk menggunakan karakter spesial,
anda harus “melepaskan” dengan miring garis terlebih dahulu.
Contoh: touch /tmp/filename\*


Alat pemisah direktori, digunakan untuk memisahkan string dari nama direktori
Contoh: /usr/src/linux


Simbol * mewakili 0 atau banyak karakter dalam nama file, atau dengan sendirinya, semua
file dalam direktori.
Contoh: pic*2002 mewakili file pic2002, picJanuary2002, picFeb292002 dll


Simbol [] dapat digunakan untuk mewakili jarak dari nilai, misal: [0-9], [a-z], dll
Contoh: hello[0-9].txt mewakili nama hello0.txt, hello1.txt, dan hello2.txt


? mewakili karakter tunggal dalam nama file
Contoh: hello?.txt dapat mewakili hello1.txt,helloz.txt, tapi bukan hello22.txt

| “Pipa”. Mengalihkan output dari satu perintah menuju perintah lainnya
Contoh: ls | more

> Mengalihkan output dari suatu perintah ke dalam file baru. Jika file sudah ada,
maka akan ditulis ulang.
Contoh: ls > file.txt

>> Mengalihkan output dari suatu perintah menuju ke akhir dari suatu file yang
sudah ada
Contoh: echo “praktikum SO ceria” >> file.txt

; Command separator. Memungkinkan anda untuk mengeksekusi banyak perintah
dalam satu baris
Contoh: cd /var/log ; less message

&& Command separator seperti sebelumnya, hanya saja akan menjalankan perintah
kedua jika perintah pertama dikerjakan tanpa ada error
Contoh: cd /var/logs && less message

& Mengeksekusi suatu perintah di background, dan langsung mendapatkan shell
anda kembali
Contoh: find / -name core > /tmp/corefile.txt &

Perintah PATH:

  1. perintah perintah paling umum berada di dalam “PATH” shell anda, berarti anda cukup mengetikkan nama dari program untuk mengeksekusinya. Contoh: mengetik “ls” akan mengeksekusi perintah “ls”
  2. variabel “PATH” shell anda berada pada lokasi program yang paling umum, seperti /bin, /usr/bin, /usr/x11r6/bin dan lain lain.
  3. Untuk mengeksekusi perintah yang tidak berada pada PATH anda saat ini, anda dapat menuliskan secara lengkap lokasi dari program tersebut. Contoh:
    1.  /home/zayretro/myprogram
    2. ./program (mengeksekusi program di direktori anda saat ini)
    3. ~/bin/program (mengeksekusi program dari personal bin direktori)

Command Syntax

Perintah dapat berjalan sendiri, atau anda dapat menambahkan argumen untuk membuatnya berbeda. Seperti inilah tipikal penulisan command syntax:
command [-argument] [-argument] [--argument] [file]
contoh:
ls menampilkan daftar file di current directory
ls -l menampilkan daftar file dengan “long” format
ls -l –color seperti diatas, dengan output berwarna
cat filename menampilkan konten dari file
cat -n filename menampilkan konten dari file, dengan nomer baris

Linux Help

Ketika anda menemukan kebuntuan dan memerlukan bantuan dengan perintah perintah di Linux, bantuan biasanya hanya dengan beberapa kata kunci. Bantuan pada perintah Linux yang paling sering digunakan biasanya dibangun ke dalam perintah itu sendiri. Tersedia melalui bantuan “man pages” dan “info pages” dan tentu saja internet.

Menggunakan perintah bantuan yang telah terpasang

Banyak perintah memiliki halaman “help” sederhana yang bisa dipanggil dengan special commands flags. Flags ini biasanya terlihat seperti “-h” atau “--help”
Contoh: grep --help

Man Pages

Sumber terbaik untuk perintah yang paling lengkap dapat ditemukan pada halaman manual, dikenal dengan nama “man pages”. Untuk membaca halaman manual dari setiap perintah, cukup ketik “man program”
Contoh:
man ls manual mengenai perintah “ls”
man man manual mengenai cara menggunakan halaman manual

Untuk mencari kata tertentu di halaman manual, ketik “/word”. Untuk keluar dari halaman manual, cukup tekan “Q”.

Terkadang, anda lupa dengan nama dari perintah perintah di Linux dan anda perlu mencarinya. Sebagai contoh, jika anda ingin mengetahui cara mengubah file permissions, anda dapat mencari halaman manual untuk kata “permission” seperti ini:
man -k permission
output dari perintah diatas kurang lebih seperti ini:
chmod (1) – change file access permissions
sekarang anda tahu bahwa “chmod” adalah perintah yang anda cari. Ketik “man chmod” akan menunjukkan kepada anda halaman manual tentang chmod

 Info Pages

Beberapa program, khususnya yang dirilis oleh Free Software Foundation, menggunakan halaman info sebagai sumber utama dokumentasinya. Halaman info sama dengan halaman manual, tapi yang ditampilkan bukan satu halaman panjang, melainkan berupa segmen yang lebih pendek dengan tautan menuju potongan-potongan informasi lainnya. Halaman info dapat diakses dengan perintah “info”, atau untuk beberapa distro Linux, “pinfo” (tampilan yang lebih baik)
Contoh: info df menampilkan halaman informasi dari “df”

Thursday, October 23, 2014

Linux Bash Shell Cheat Sheet

Basic Terminal Shortcuts

CTRL L = Clear the terminal
CTRL D = Logout
CTRL A = Cursor to start of line
CTRL E = Cursor to the end of line
CTRL U = Delete left of the cursor
CTRL K = Delete right of the cursor
CTRL W = Delete word on the left
CTRL Y = Paste (after CTRL U, K or W)
CTRL R = Reverse search history
CTRL Z = Stops the current command

SHIFT Page Up/Down = Go Up/Down the terminal

TAB = Auto completion of file or command

!! = Repeat last command

Basic Terminal Navigation

ls -a = list all files and folders
ls <folderName> = list files in folde
ls -lh = Detailed list, Human readable
ls -l *.jpg = list jpeg files only
ls -lh <fileName> = Result for file only

cd <folderName> = change directory
                              if folder name has spaces use “ “
cd / = go to root
cd .. = go up one folder, tip: ../../../

du -h: Disk usage of folders, human readable
du -ah: “ “ “ files & folders, Human readable
du -sh: only show disc usage of folders

pwd = print working directory

man <command> = shows manual (RTFM)

Basic File Manipulation

cat <fileName> = show content of file (less, more)

head = from the top
             -n <#oflines> <fileName>

tail = from the bottom
            -n <#oflines> <fileName>

mkdir = create new folder
mkdir myStuff ..
mkdir myStuff/pictures/ ..

cp image.jpg newimage.jpg = copy and rename a file
cp image.jpg <folderName>/ = copy to folder
cp image.jpg folder/sameImageNewName.jpg
cp -R stuff otherStuff = copy and rename a folder
cp *.txt stuff/ = copy all of *<file type> to folder

mv file.txt Documents/ = move file to a folder
mv <folderName> <folderName2> = move folder in folder
mv filename.txt filename2.txt = rename file
mv <fileName> stuff/newfileName
mv <folderName>/ .. = move folder up in hierarchy

rm <fileName> .. = delete file (s)
rm -i <fileName> .. = ask for confirmation each file
rm -f <fileName> = force deletion of a file
rm -r <foldername>/ = delete folder

touch <fileName> = create or update a file

ln file1 file2 = physical link
ln -s file1 file2 = symbolic link

Researching Files

The slow method (sometimes very slow):

locate <text> = search the content of all the files
locate <fileName> = search for a file
sudo updatedb = update database of files

find = the best file search tool (fast)
find -name “<fileName>”
find -name “text” = search for files who start with the word text
find -name “*text” = “ “ “ “ end “ “ “ “

Advanced Search:

Search from file Size (in ~)
             find ~ -size +10M = search files bigger than.. (M,K,G)

Search from last access
           find -name “<filetype>” -atime -5
                   ('-' = less than, '+' = more than and nothing = exactly)

Search only files or directory’s
            find -type d --> ex: find /var/log -name "syslog" -type d
            find -type f = files
 More info: man find, man locate

Extract, sort and filter data

grep <someText> <fileName> = search for text in file
            -i = Doesn't consider uppercase words
            -I = exclude binary files
grep -r <text> <folderName>/ = search for file names with occurrence of the text

With regular expressions:

grep -E ^<text> <fileName> = search start of lines with the word text
grep -E <0-4> <fileName> =shows lines containing numbers 0-4
grep -E <a-zA-Z> <fileName> = retrieve all lines with alphabetical letters

sort = sort the content of files
sort <fileName> = sort alphabetically
sort -o <file> <outputFile> = write result to a file
sort -r <fileName> = sort in reverse
sort -R <fileName> = sort randomly
sort -n <fileName> = sort numbers

wc = word count
wc <fileName> = nbr of line, nbr of words, byte size -l (lines), -w (words), -c (byte size), -m (number of characters)

cut = cut a part of a file
-c --> ex: cut -c 2-5 names.txt (cut the characters 2 to 5 of each line)
-d (delimiter) (-d & -f good for .csv files)
-f (# of field to cut)

more info: man cut, man sort, man grep

Time settings

date = view & modify time (on your computer)

View:
date “+%H” --> If it's 9 am, then it will show 09 -r
date “+%H:%M:%Ss” = (hours, minutes, seconds)
%Y = years

Modify:
MMDDhhmmYYYY
Month | Day | Hours | Minutes | Year

sudo date 031423421997 = March 14th 1997, 23:42

Execute programs at another time

use 'at' to execute programs in the future

Step 1, write in the terminal: at <timeOfExecution> ENTER
 ex --> at 16:45 or at 13:43 7/23/11 (to be more precise)
or after a certain delay:
at now +5 minutes (hours,days, weeks, months, years)

Step 2: <ENTER COMMAND> ENTER
           repeat step 2 as many times you need

Step 3: CTRL D to close input

atq = show a list of jobs waiting to be executed

atrm = delete a job n°<x>

ex (delete job #42) --> atrm 42

sleep = pause between commands
             with ';' you can chain commands, ex: touch file; rm file you can make a pause between commands (minutes, hours, days)
ex --> touch file; sleep 10; rm file <-- 10 seconds

crontab = execute a command regularly
             -e = modify the crontab
             -l = view current crontab
             -r = delete you crontab
In crontab the syntax is
<Minutes> <Hours> <Day of month> <Day of week (0-6, 0 = Sunday)> <COMMAND>

ex, create the file movies.txt every day at 15:47:
47 15 * * * touch /home/bob/movies.txt
* * * * * --> every minute
at 5:30 in the morning, from the 1st to 15th each month:
30 5 1-15 * *
at midnight on Mondays, Wednesdays and Thursdays:
0 0 * * 1,3,4
every two hours:
0 */2 * * *
every 10 minutes Monday to Friday:
*/10 * * * 1-5

Execute programs in the background

Add a '&' at the end of a command
ex --> cp bigMovieFile.mp4 &

nohup: ignores the HUP signal when closing the console
(process will still run if the terminal is closed)
ex --> nohup cp bigMovieFile.mp4

jobs = know what is running in the background

fg = put a background process to foreground
ex: fg (process 1), f%2 (process 2) f%3, ...

Process Management

w = who is logged on and what they are doing

tload = graphic representation of system load average (quit with CTRL C)

ps = Static process list
         -ef --> ex: ps -ef | less
         -ejH --> show process hierarchy
         -u --> process's from current user

Dynamic process list
While in top:
• q to close top
• h to show the help
• k to kill a process

CTRL C to top a current terminal process

kill = kill a process
You need the PID # of the process
ps -u <AccountName> | grep <Application>
Then
kill <PID> .. .. ..
kill -9 <PID> = violent kill

killall = kill multiple process's
ex --> killall locate

extras:
sudo halt <-- to close computer
sudo reboot <-- to reboot

Create and modify user accounts

sudo adduser bob = root creates new user
sudo passwd <AccountName> = change a user's password
sudo deluser <AccountName> = delete an account

addgroup friends = create a new user group
delgroup friends = delete a user group

usermod -g friends <Account> = add user to a group
usermod -g bob boby = change account name
usermod -aG friends bob = add groups to a user without loosing the ones he's already in

File Permissions

chown = change the owner of a file. ex --> chown bob hello.txt
chown user:bob report.txt = changes the user owning report.txt to 'user' and the group owning it to 'bob'
-R = recursively affect all the sub folders. ex --> chown -R bob:bob /home/Daniel

chmod = modify user access/permission – simple way
        u = user
        g = group
        o = other
        d = directory (if element is a directory)
         l = link (if element is a file link)
         r = read (read permissions)
        w = write (write permissions)
        x = eXecute (only useful for scripts and programs)

'+' means add a right
'-' means delete a right
'=' means affect a right

ex --> chmod g+w someFile.txt (add to current group the right to modify someFile.txt)

more info: man chmod

Flow redirection

Redirect results of commands:
'>' at the end of a command to redirect the result to a file. ex --> ps -ejH > process.txt
'>>' to redirect the result to the end of a file

Redirect errors:
'2>' at the end of the command to redirect the result to a file. ex --> cut -d , -f 1 file.csv > file 2> errors.log
'2>&1' to redirect the errors the same way as the standard output

Read progressively from the keyboard
             <Command> << <wordToTerminateInput>
ex --> sort << END <-- This can be anything you want
       > Hello
       > Alex
       > Cinema
       > Game
       > Code
       > Ubuntu
       > END
terminal output:
Alex
Cinema
Game
Code
Ubuntu

Another example --> wc -m << END

Chain commands

'|' at the end of a command to enter another one. ex --> du | sort -nr | less

Archive and compress data

Archive and compress data the long way:

Step 1, put all the files you want to compress in the same folder: ex --> mv *.txt folder/
Step 2, Create the tar file:
tar -cvf my_archive.tar folder/
-c : creates a .tar archive
-v : tells you what is happening (verbose)
-f : assembles the archive into one file

Step 3.1, create gzip file (most current):
gzip my_archive.tar
to decompress: gunzip my_archive.tar.gz

Step 3.2, or create a bzip2 file (more powerful but slow):
bzip2 my_archive.tar
to decompress: bunzip2 my_archive.tar.bz2

step 4, to decompress the .tar file:
tar -xvf archive.tar archive.tar

Archive and compress data the fast way:

gzip: tar -zcvf my_archive.tar.gz folder/
decompress: tar -zcvf my_archive.tar.gz Documents/

bzip2: tar -jcvf my_archive.tar.gz folder/
decompress: tar -jxvf archive.tar.bz2 Documents/

Show the content of .tar, .gz or .bz2 without decompressing it:

gzip:
gzip -ztf archive.tar.gz

bzip2:
bzip2 -jtf archive.tar.bz2

tar:
tar -tf archive.tar

tar extra:
 tar -rvf archive.tar file.txt = add a file to the .tar

You can also directly compress a single file and view the file without decompressing:

Step 1, use gzip or bzip2 to compress the file:
gzip numbers.txt

Step 2, view the file without decompressing it:
zcat = view the entire file in the console (same as cat)
zmore = view one screen at a time the content of the file (same as more)
zless = view one line of the file at a time (same as less)

Installing software

When software is available in the repositories:
sudo apt-get install <nameOfSoftware>
ex--> sudo apt-get install aptitude

If you download it from the Internets in .gz format (or bz2) - “Compiling from source”

Step 1, create a folder to place the file:
mkdir /home/username/src <-- then cd to it

Step 2, with 'ls' verify that the file is there
(if not, mv ../file.tar.gz /home/username/src/)

Step 3, decompress the file (if .zip: unzip <file>)

Step 4, use 'ls', you should see a new directory

Step 5, cd to the new directory

Step 6.1, use ls to verify you have an INSTALL file, then: more INSTALL

If you don't have an INSTALL file:
Step 6.2, execute ./configure <-- creates a makefile
Step 6.2.1, run make <-- builds application binaries
Step 6.2.2 : switch to root --> su
Step 6.2.3 : make install <-- installs the software
Step 7, read the readme file

Reference
http://cli.learncodethehardway.org/bash_cheat_sheet.pdf

Wednesday, October 22, 2014

Install Ubuntu Dengan Virtual Box

Virtual Box adalah software yang digunakan untuk membuat virtual komputer, sehingga memungkinkan kita bisa menginstall lebih dari satu OS dalam komputer tanpa menjadikannya menjadi dual boot.

Langkah-langkah untuk menginstall OS di Virtual Box adalah sebagai berikut:
1. Buka aplikasi Virtual Box yang sebelumnya sudah di install lalu klik New.


2. Muncul dialog box sebagai berikut, klik Next.


3. Isi text box nama virtual machine dan pilih OS yang diinginkan lalu klik Next.


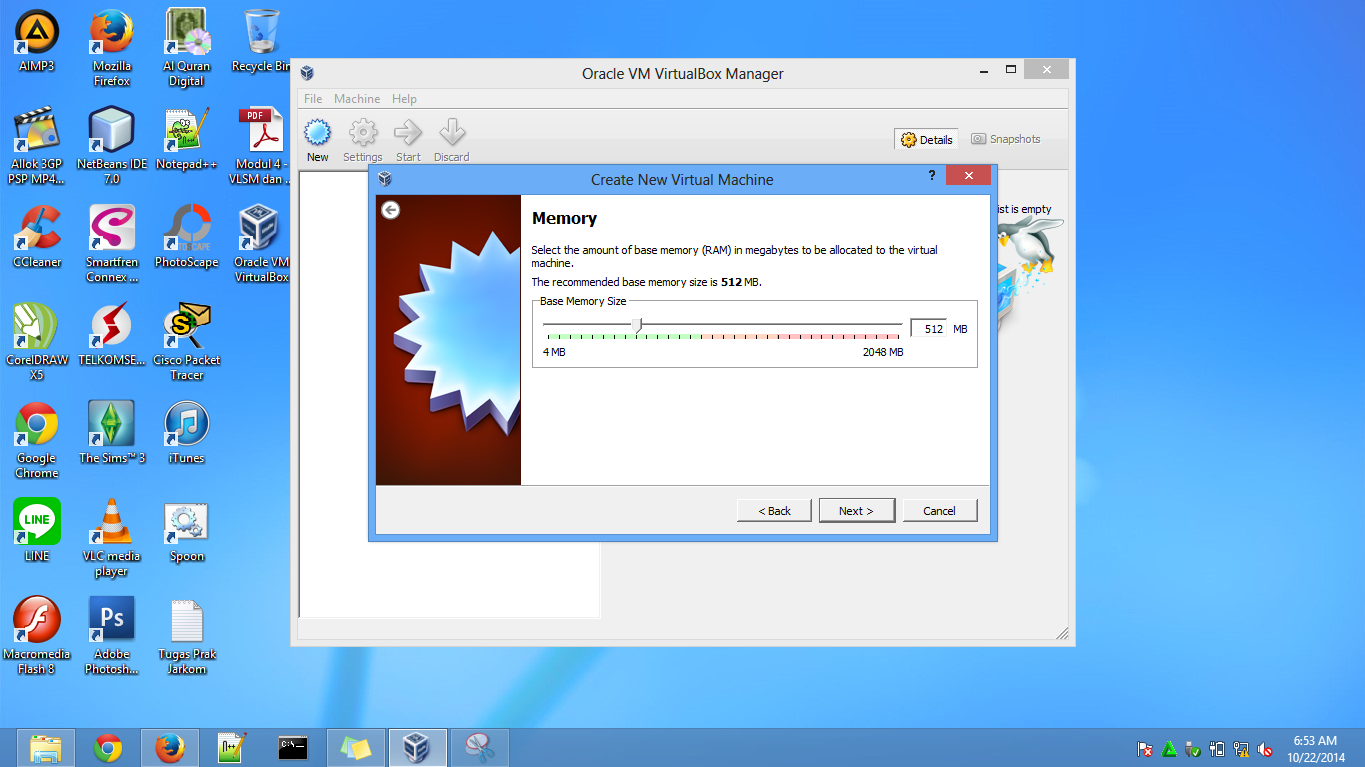
4. Tentukan besar RAM untuk Virtual Box nya.


5. Pilih Create New Harddisk


6. Pilih File Type VDI.


7. Pilih Dynamically allocated agar virtual disk file bisa diubah lalu klik Next.


8. Tentukan besar ukuran file.


9. Klik Create.


10. Klik Create.


11. Klik Start.


12. Klik Next.


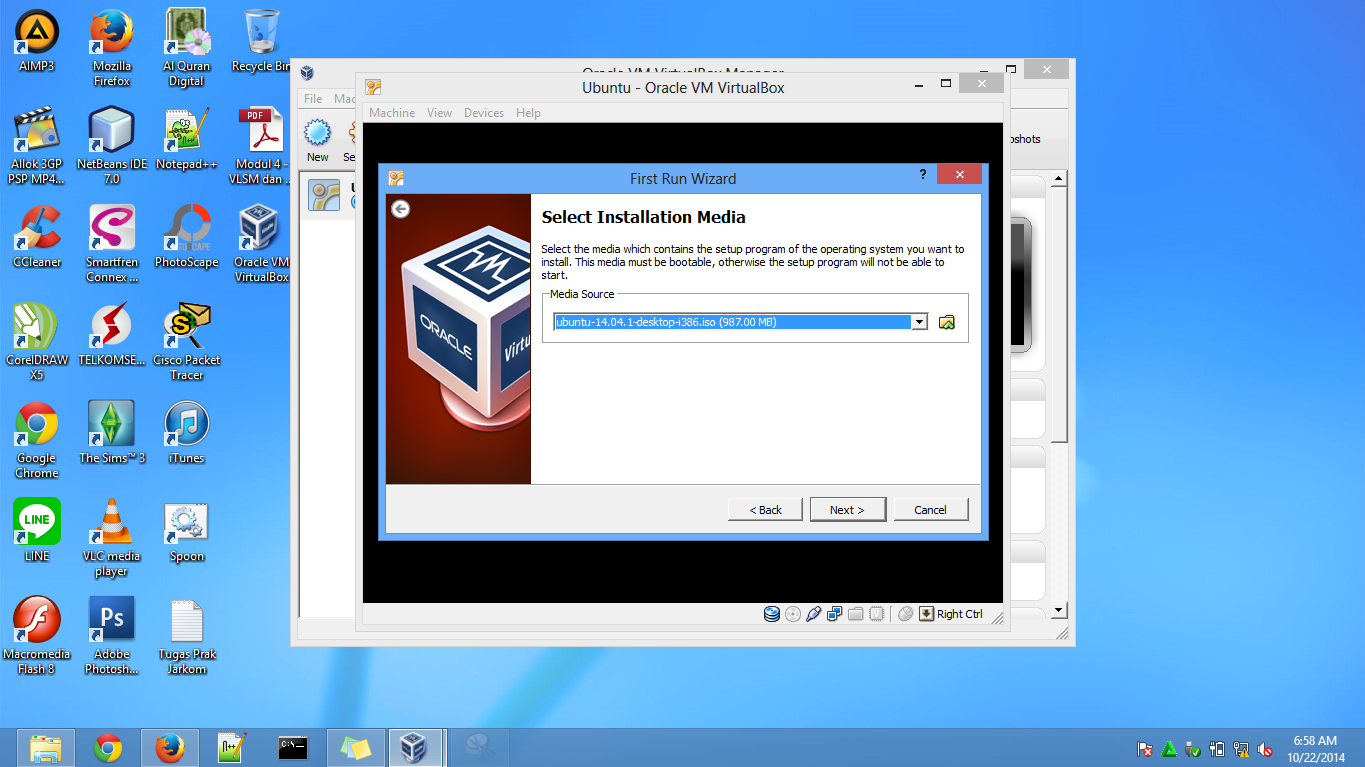
13. Pilih media installasi.


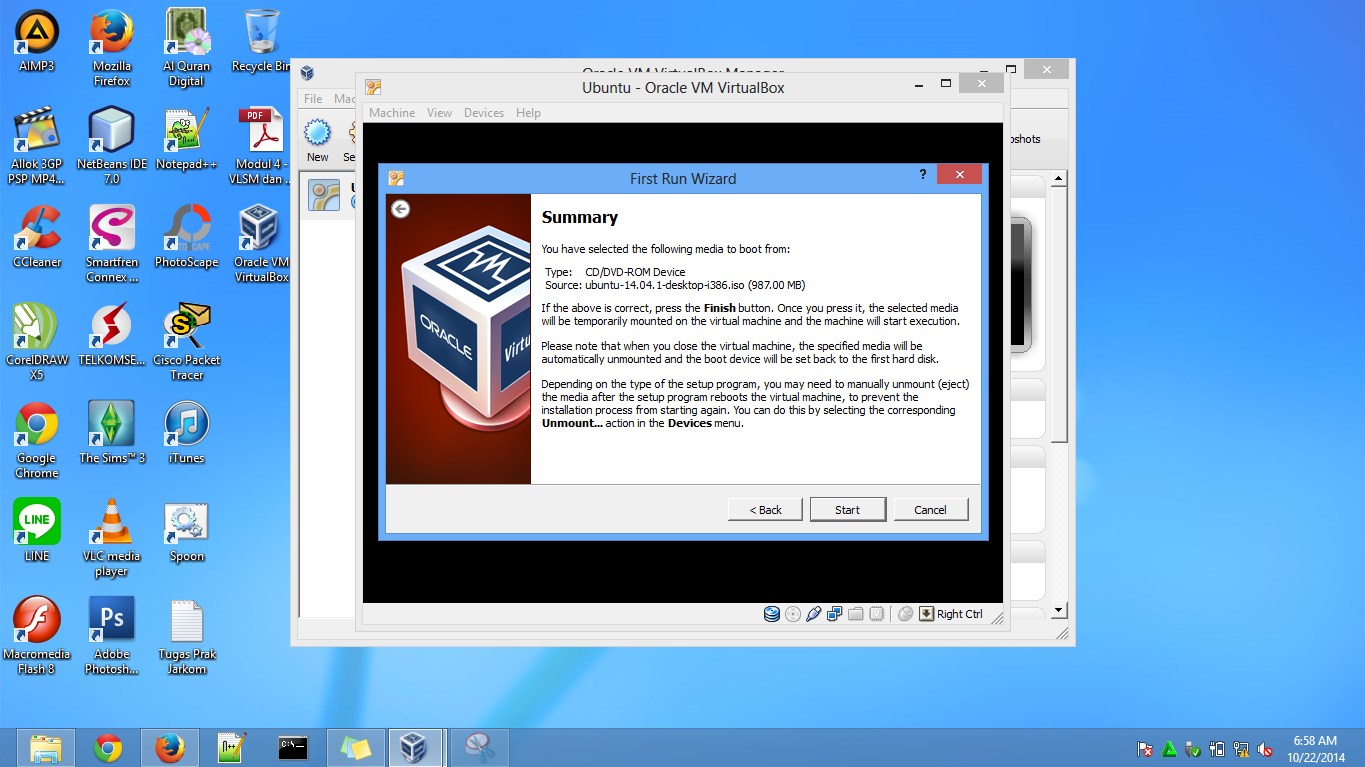
14. Klik Start.


15. Tunggu beberapa saat.


16. Pilih Install Ubuntu.


17. Pilih tipe install yang diinginkan.


18. Klik New Partition Table


19. Pilih Continue.


20. Tentukan partisi sebagai berikut:


21. Jika sudah, klik Install Now


22. Tentukan zona waktu dan pilih layout keyboard yang diinginkan.


23. Isi Username dan Password lalu klik Continue.


24. Tunggu sampai proses Install selesai.


25. Jika sudah selesai Restart PC.


26. Ini tampilan Desktop Ubuntu di Virtual Box.


Pilih Dynamically alocated sehingga ukuran virtual disk file bisa diubah – ubah, jika ingin tetap pilih fixed size. Kemudian klik next. - See more at: file:///C:/Users/ghita%20marshelina/Downloads/Cara%20Atau%20Langkah-Langkah%20Install%20Linux%20dengan%20Virtualbox%20_%20Pentium%20Blog.htm#sthash.EpbU1SZ5.dpuf
Virtualbox adalah salah satu software yang digunakan untuk membuat virtual komputer, sehingga dimungkinkan kita bisa menginstall lebih dari 1 OS dalam 1 komputer. - See more at: file:///C:/Users/ghita%20marshelina/Downloads/Cara%20Atau%20Langkah-Langkah%20Install%20Linux%20dengan%20Virtualbox%20_%20Pentium%20Blog.htm#sthash.EpbU1SZ5.dpufV
Virtualbox adalah salah satu software yang digunakan untuk membuat virtual komputer, sehingga dimungkinkan kita bisa menginstall lebih dari 1 OS dalam 1 komputer. - See more at: file:///C:/Users/ghita%20marshelina/Downloads/Cara%20Atau%20Langkah-Langkah%20Install%20Linux%20dengan%20Virtualbox%20_%20Pentium%20Blog.htm#sthash.EpbU1SZ5.dpuf

Thursday, October 9, 2014

Bluemix by IBM

IBM adalah perusahaan yang bergerak di biang teknologi sejak 103 tahun yang lalu. Sedangkan di Indonesia baru berumur 75 tahun dengan pelanggan pertama yaitu PT. KAI.

IBM juga mengembangkan Cloud Computing, yaitu metoda komputasi di mana kapabilitas terkait teknologi informasi disajikan sebagai suatu layanan sehingga pengguna dapat mengaksesnya lewat internet.

Layanan yang terdapat pada Cloud Computing ada 3, yaitu:
1. Infrastructure as a Service (IaaS)
Menyediakan code, data, runtime, middleware, OS. Produk dari IBM yaitu SoftLayer dengan salah satu penggunanya adalah Path.
2. Platform as a Service (PaaS)
Menyediakan code dan data. Produk dari IBM yaitu Bluemix.
3. Software as a Service (SaaS)
Vendor memanajemen di cloud yaitu applications, data, runtime, middleware, O/S, virtualization, servers, storage dan networking.

Kenapa menggunakan Bluemix?
1. Safe money and time
2. Continuously deliver

Kelebihannya?
1. Support semua bahasa pemrograman
2. Coding via online atau outline (dengan sublime, eclipse, atau dngan cloud foundry command line)
3. Bisa memonitor aplikasi
4. Ada tools untuk melindungi aplikasi

Cara menggunakannya:
1. Sign Up di http://www.bluemix.net
2. Install Cloud Foundry
3. Log In ke Bluemix dengan menggunakan Cloud Foundry command line
4. Install runtime (jika diperlukan)
4. Develop project